
AMP Guide
Much has been written and said about it. Those who love, those who don't, those who are confused, those who are not sure whether to apply, those who gave up, have all been expressing their ideas about AMP for more than 2 years. We also wanted to touch upon what AMP is, how it is applied, from what does this technology draws its strength from, what it gets from you, and we wanted to compile the problems encountered with global case studies and application results through application examples. We hope that we can resolve the question marks and support your decision on whether or not to use this technology.
What is AMP?
Accelerated mobile pages, AMP in short, is an open-source mobile technology that Google announced in 2015, which started to show its results on SERP in 2016, which enables pages to be opened faster. In the results section, AMP pages are marked with the Google AMP icon.
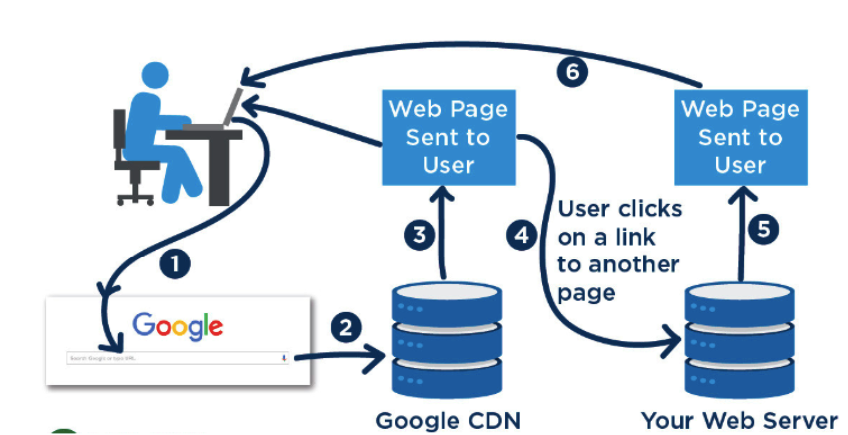
Aside from the classical definition; Google keeps your pages in its cache to serve them faster. In other words, normally a user who clicks on a page on Google requests all the files and the block of code over your server by sending a request to your server through the browser, in AMP, we can say that this process takes place entirely through Google. Your server doesn't receive any requests, the page is served through the server that Google holds in its memory and the page opens faster. When it comes to how it does this, the components of AMP technology come to the forefront:
- AMP HTML
- AMP JavaScript
- AMP Cache
You may be asking why there are components like AMP HTML, AMP JavaScript, so let's first explain this and then elaborate these components. Google imposes a number of restrictions on web pages to serve their AMP pages quickly from its cache. It does not allow code other than its own defined JavaScript library to reduce the JavaScript load, it says that when you use CSS it should be inline and have only one style (maximum 50 kb) and for static HTML it requires the use of tags created for AMP.
You may remember we elaborated on the critical processes of opening a page and mentioned that prolonged times in the Critical Rendering Path section slowed down the speed of the site in the first article of this series. As a solution to all of the processes and issues there, Google suggests that you turn your pages into a language that can be fully understood by it via a simpler coding system and advocates the need for this coding which can be serviced quickly from its cache without complicating the issues. The three pictures below actually summarize the situation. In the case of AMP, we can understand how much resources are simplified and thus a more simple structure is created, and which, of course, will accelerate the site.
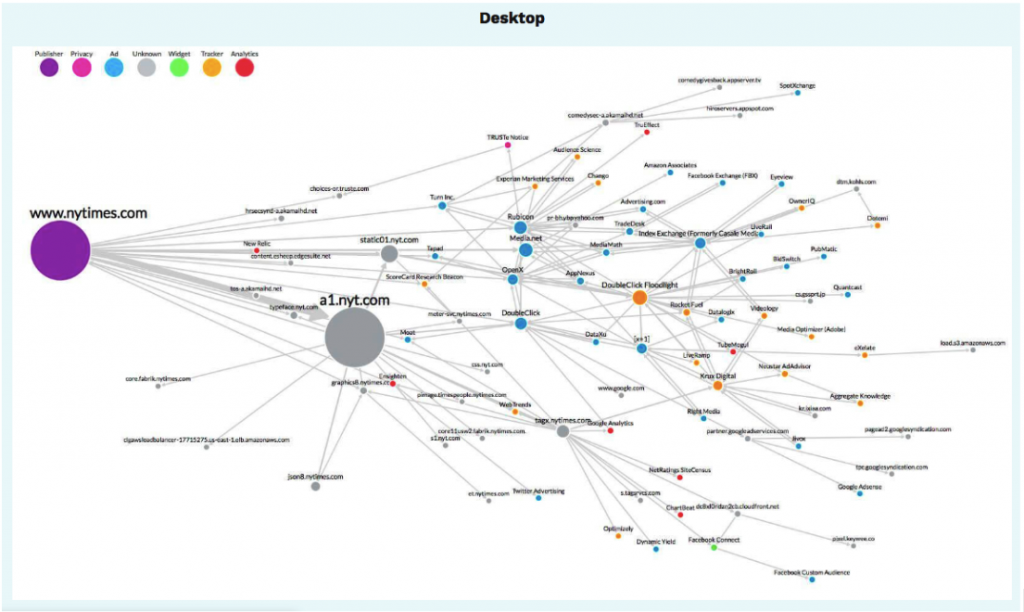
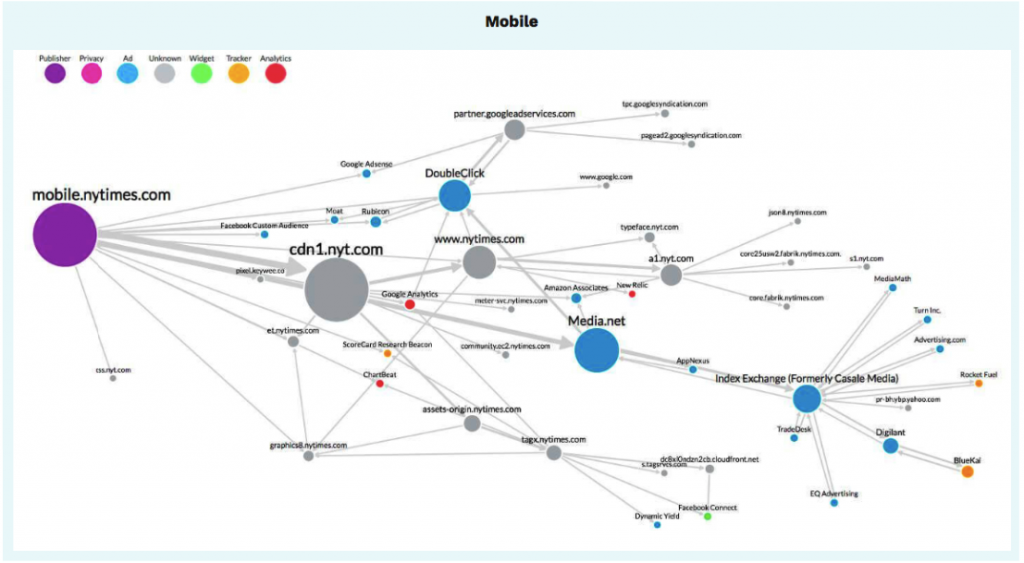
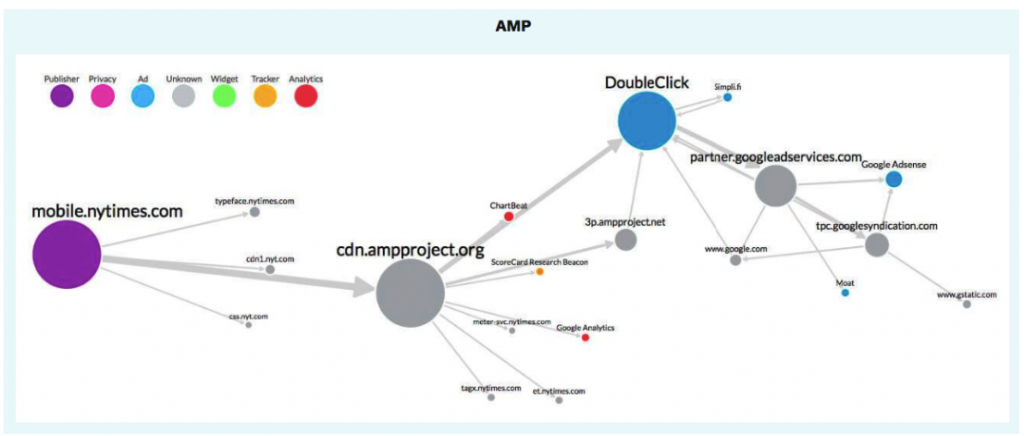
Source: Evidon
Now let's go into detail of the components.
AMP HTML
AMP HTML contains codes that must be in and that are not allowed. The following codes are the ones that must be present.
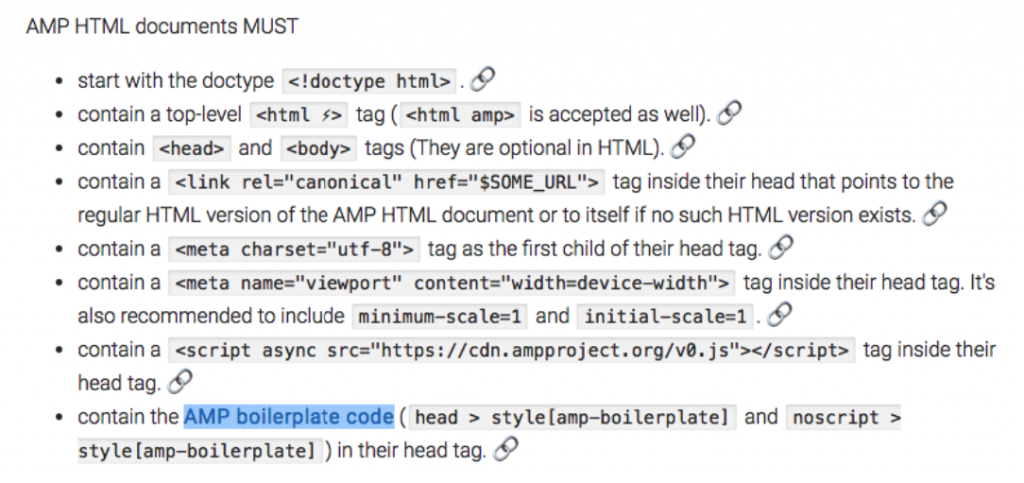
Above, we only see the AMP boilerplate code which may be unfamiliar. In short, the AMP boilerplate code prevents the page from being displayed until the page is rendered. In other words, non-style content is kept from the user, not shown immediately and the page is shown when the rendering process is finished. So, What happens if the Javascript library is not loaded for render process?
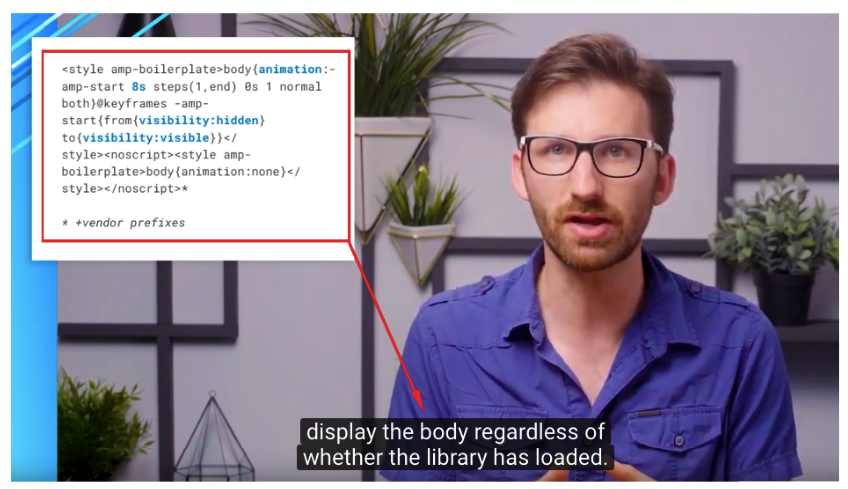
In the example above; If the JS library is not loaded in 8 seconds, it is mentioned that since it has animation encoding, any style content can be displayed. If this encoding is not available and the JavaScript library does not work, the user is shown a blank page. You can reach full video from this link. However, as you can imagine, FCP (FirstContentfulPaint) is experiencing a delay due to this code. Yes, perhaps you are setting up AMP for speed, but you may not be able to achieve the desired speed without making the necessary optimizations. The HTML tags that is not allowed, or rather have their equivalent in AMP, are as follows.
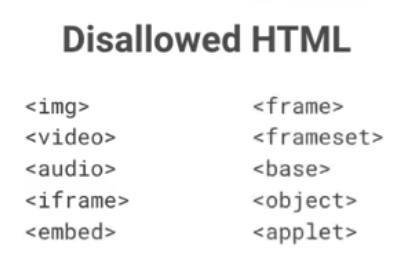
We need to use AMP versions instead of these tags.
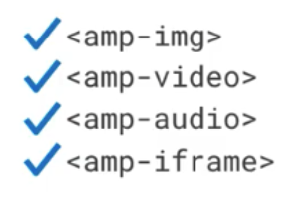
If this is not done, your AMP pages will not be validated.
AMP JavaScript
AMP JavaScript means that a JavaScript code can’t be generated by you. You can use and implement the JavaScript codes defined in the AMP JavaScript library, but unfortunately, you are not allowed to do anything else at this time. Again in the first article of the series, we mentioned the render-blocking feature of JavaScript. The goal in AMP is removing the codes that stop this process and loaded synchronously, thus load them asynchronously and therefore not interfering with the DOM tree creation process. Thus, you can use the JavaScript library to the extent allowed, and for this, it can specify approaches such as lazy loading, async and allowing your page to be opened faster.
For example, we said that the layout did not occur until the DOM tree was created, that is, all resources were rendered on a regular page. At the end of the process, the browser only decides which content is available in what way on the screen. In the AMP, the size of such resources must be given. So during the execution process, the browser knows its size before it loads, and knows where and how to place it. Good news! We said AMP doesn't allow JavaScript. However, last year's AMP Conference 2018 had good news. Although they cannot guarantee that it will work, there are serious signals that they will be permitting to write code for JavaScript in AMP documents for 2019.

You can access the link to the video from here.
AMP Cache
If you have created your page in accordance with all rules and if it appears to be validated with AMP Test, this will mean Google will start serving your page on its own CDN. If you have updated your content and want Google to see and index it as soon as possible, you can remove the old content and update it with a new one via the update-cache request. There are currently two AMP Cache providers; Google AMP Cache and Cloudflare AMP Cache. However, in September 2018 Bing announced AMP viewer and AMP Cache.
AMP Advantages
If we were to mention its advantages, First of all, AMP is not a necessity or ranking factor. There is no guarantee that when you create an AMP page it will come out first. However, you need to evaluate your competition area well and determine what your website needs. Your competitors may be using this technology in a page or group of pages that are important to you, using AMP may be inevitable especially if you are a news site for Google News, you may be far behind in site speed and you may want to implement AMP as a solution in this case. The main advantage of AMP is that it can be opened quite quickly compared to a normal page in terms of user experience.
On the other hand, it can be said that it is relieving the load on your server by serving it through Google.
AMP Disadvantages
Disadvantages have been a matter of contention for a long time, especially among SEO experts. The most striking criticism of AMP is that Google's efforts to dominate a free environment such as the Internet, by setting its own rules and forcing the websites to do so. I strongly recommend you to review Barry Adams’ AMP Can Go To Hell. On the other hand, the reason why AMP is so fast is that Google doesn't allow a large variety of codes, we mentioned that you can use code components from its defined library. Therefore, another outstanding disadvantage is that you cannot do everything you want on your pages with these restrictions. We have mentioned that AMP can allow the use of JavaScript in 2019, and I am sure that these restrictions will be further reduced in the coming years, but we should not expect that the number will increase by a lot as long as the speed is the main agenda item.
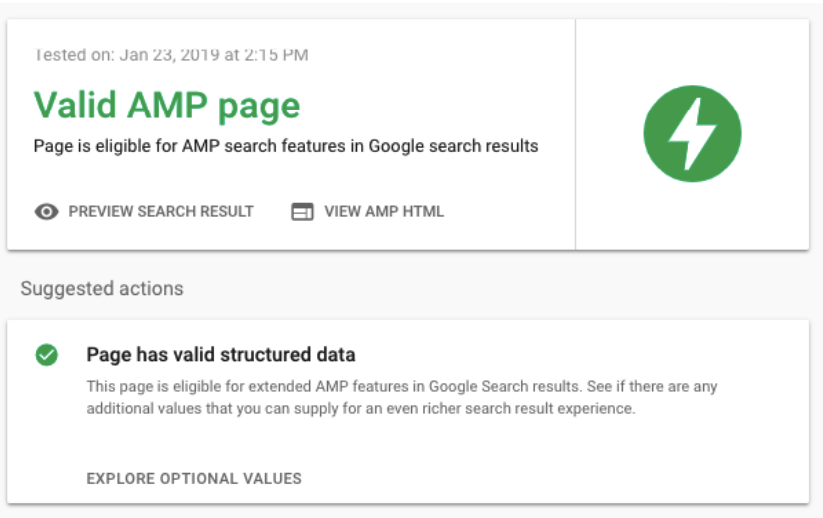
AMP Errors
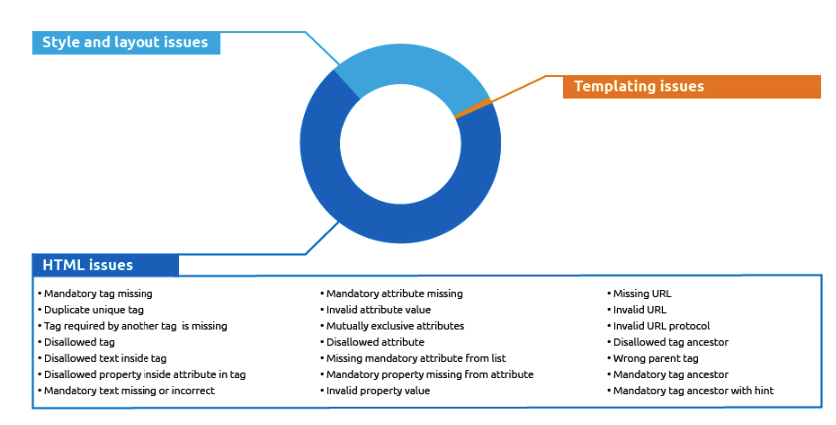
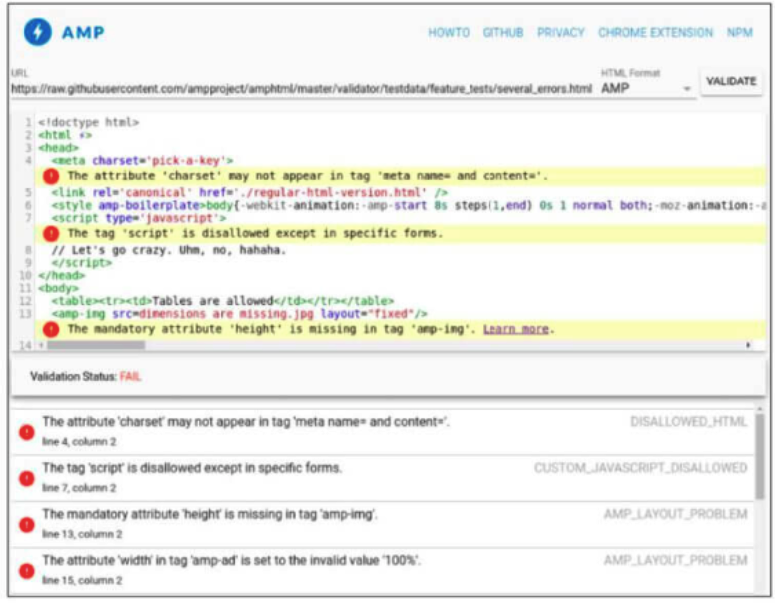
The greatest percentage of AMP validation errors is often seen as either mandatory HTML tags not used or the use of unauthorized tags / codes. These incorrect codes are indicated on the Search Console. On the other hand, you can see why your page is not validated with AMP Validator, and you can correct these errors. Another way to check is by adding #development=1 to the end of the URL when you are on your AMP page. After that open the Console tab in DevTools. You will see a screen like the one below.
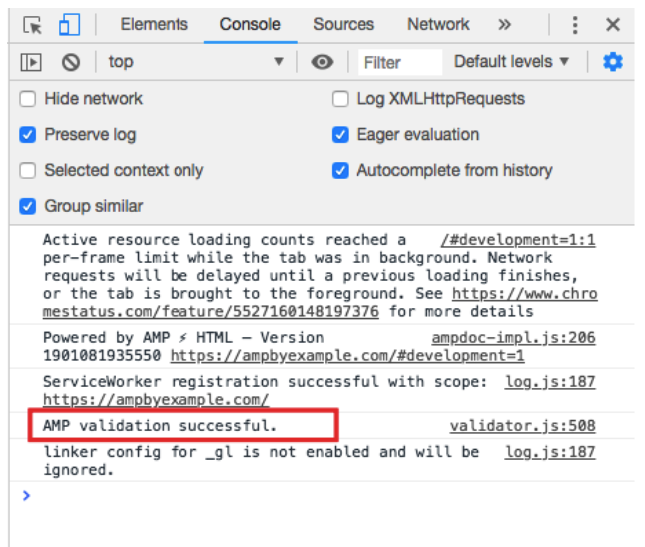
For example, if you did not add an image you added later in the form of amp-img, your page will give an error. Or, if there is a script on the page outside the AMP library, your page will again give an error. In other words, Google AMP only accepts the pages that precisely follow the rules that they set and serves only those through their CDN.
When Do I Need AMP?
The use of AMP can be inevitable for you if you are a news site. Other than that, it would be quite wrong to say AMP is used when this happens or that happens. You should review your competitors, determine which pages you may need and you must TEST! When it comes to speed, try to optimize your site first. You can then test AMP on specific pages. You can also check out the first article of the series for Site Speed Optimization.
AMP Usage Rates
Let's look at how usage rates changed for this technology in the two years it has been talked about.
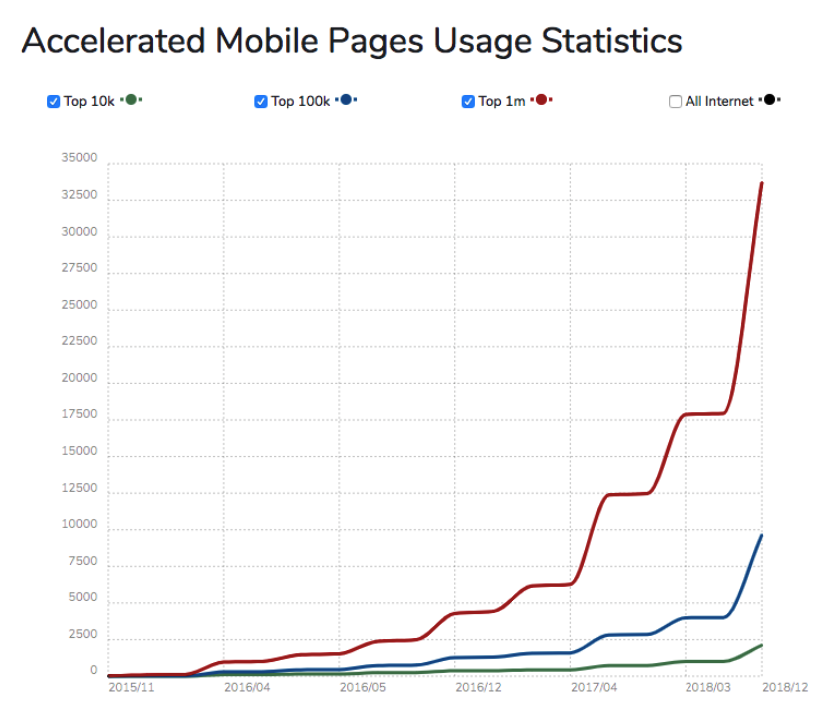
Source: BuiltWith
While there is no high acceleration in AMP usage rate, especially in the top 10k sites, we see a significant increase after 2018 when we look at the top 100k and top 1M charts. As speed is a ranking factor, it can be influenced by those who use AMP as a solution to speed their site, or removal of the application’s uncertainties as the time passes may have created a safe area for those who want to use it. If we want to make a more geographical analysis, we see the following data.
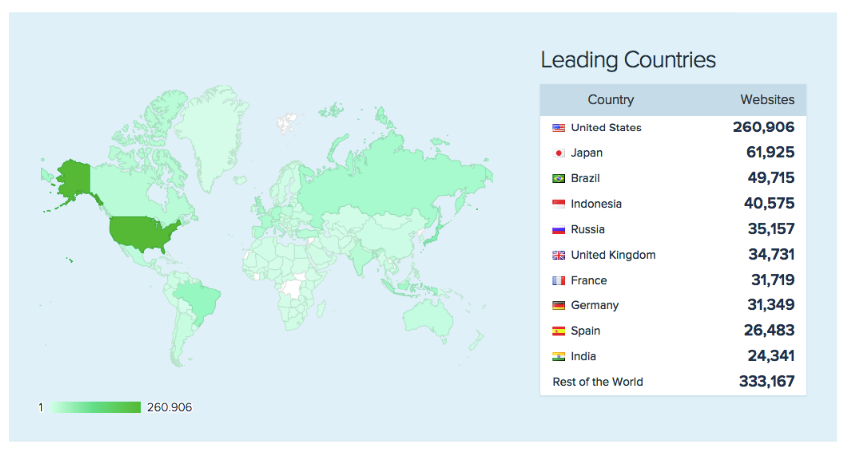
Source: Similartech
If you've wondered where Turkey is in here, according to the current data from BuiltWith site there are active AMP's website pages 2069 in Turkey. Finally, let's look at AMP usage rates by category.
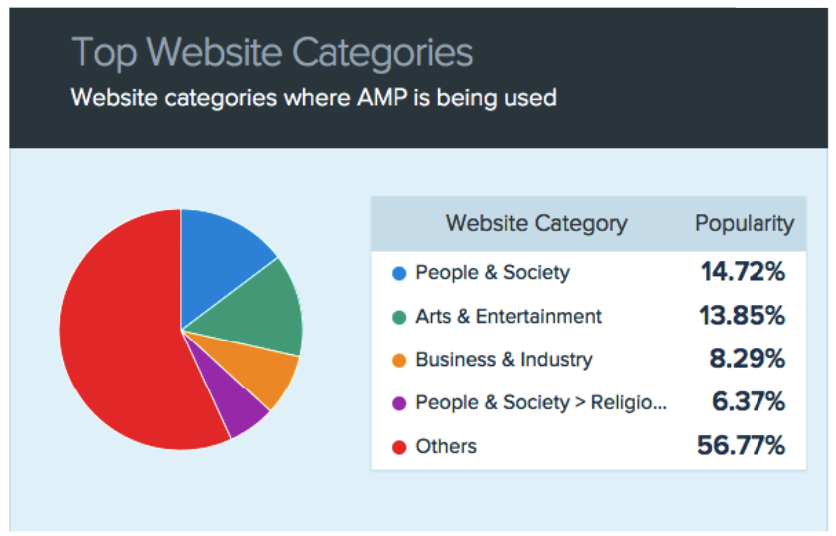
Source: Similartech
AMP Case Study
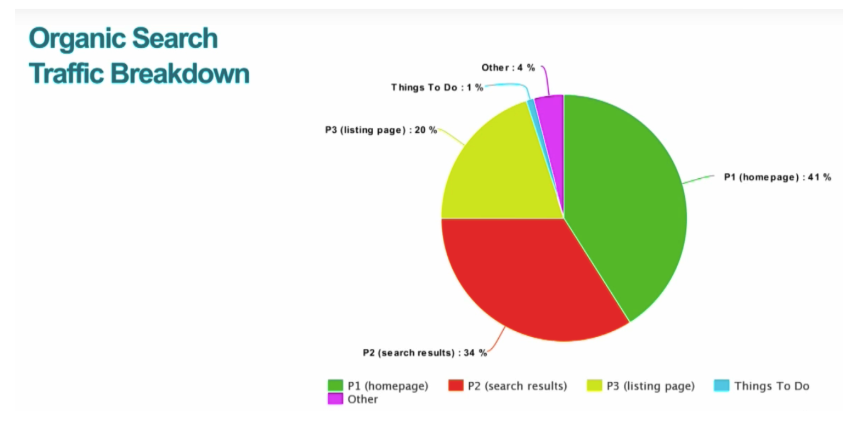
One of the outstanding case studies at the AMP Conference is Airbnb's AMP experience. You can reach to the video of the presentation with this link. If we were to briefly describe the experience Airbnb has; Airbnb has three different page structures. The main pages (P1), the search pages (P2) in which they list the houses and the detail pages of the houses, ie product pages (P3). First of all, they think about which page type they can apply AMP. They don’t apply the AMP decision on the P1 home page, as it is the most important page with high traffic and frequently changing design. On the other hand, while the P3 product pages seem preferable to try AMP in because of low conversion rate, they decide not to try AMP in this type of page too, due to technical problems. Finally, they decide to apply it on P2 search pages.
The biggest problem they face after an application is server-side rendering time out problem. They have a time out problem with a very high figure of 16% on the pages. When only a blank page is displayed when time out happens.
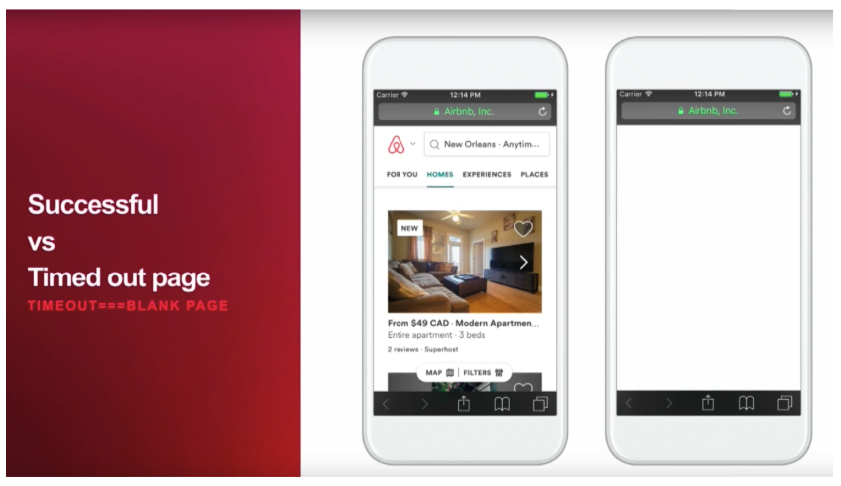
When the page comes up blank, Google should redirect to the canonical page. However, the Airbnb team state that it's a Google bug, and says the page looks like this.
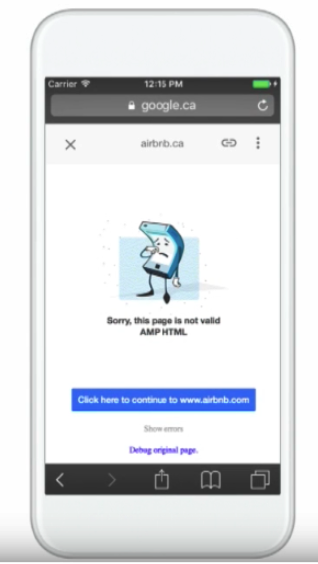
Their action to solve this problem here was a 30-minute CDN cache application and they have managed to reset the 16% error to zero. For other problems they faced and the solutions they used, you should watch the video. The reason I chose this example, in particular, is It is a case study in the AMP Conference :) that is not praising AMP but has a critical approach. However, there are also case studies that have been successful without problems in AMP implementation.
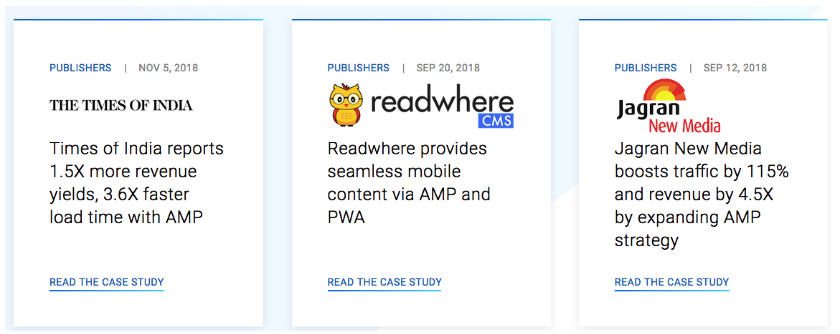
Again you can visit amp project for these examples. If you have decided to try AMP, after all, let's continue with our installation guide.
AMP Setup (Wordpress)
In this section, we will talk about how to quickly install AMP if you use Wordpress more often. If we were to detail the most recommended plug-ins for Wordpress and this installation phase;
1) Downloading and Installing AMP Plugin
We download and install the AMP Plug by Automattic. With this plugin, you can only make posts AMP compatible, not pages. However, we must install this plug. Therefore, we are downloading a second plugin. AMP for WP plugin allows for Google Adsense integration, rel=canonical tag support, drag and drop page configuration, and more. Last but not least we download and install the Glue for Yoast SEO & AMP plugin, but the point to note is that Yoast SEO must also be installed and active.

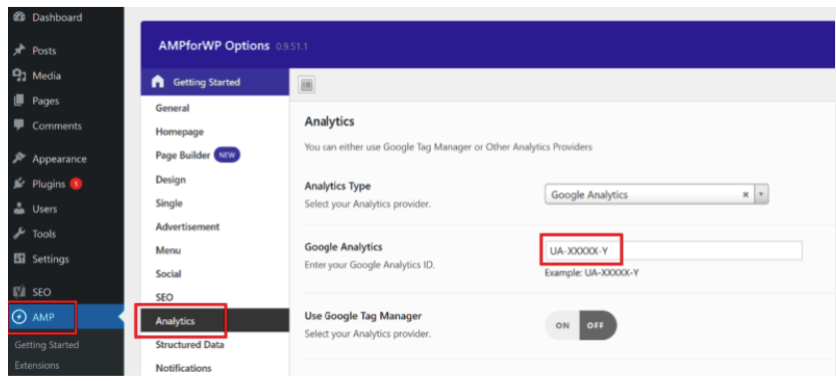
2) Adding Google Analytics Tracking Code
You need to copy and save your existing Google Analytics tracking code to the Analytics section under AMPforWP Options in Wordpress.
3) Plugin Configurations
When you follow the path of Yoast SEO - AMP - Post Type, you will see the following options.
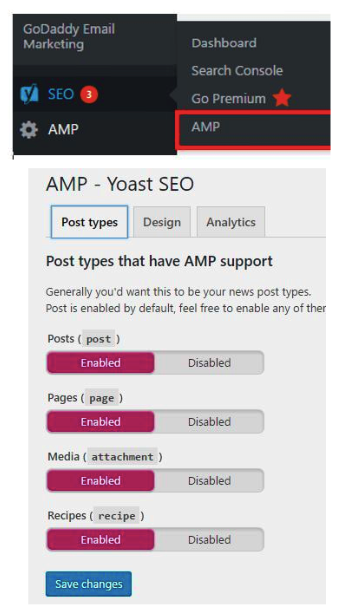
Here you can choose which pages you want to make AMP, and customize your pages in the Design section.
4) Google AMP Test
So, we have created AMP URLs. These pages need to be validated for Google to add these pages to Cache. So we need to test the URLs we create. To do this, we need to go to Google's own testing site. You can reach there with this link.
On the other hand, you can also use AMP Validator to see for which errors they are not validated.
5) Presenting AMP Pages to Google
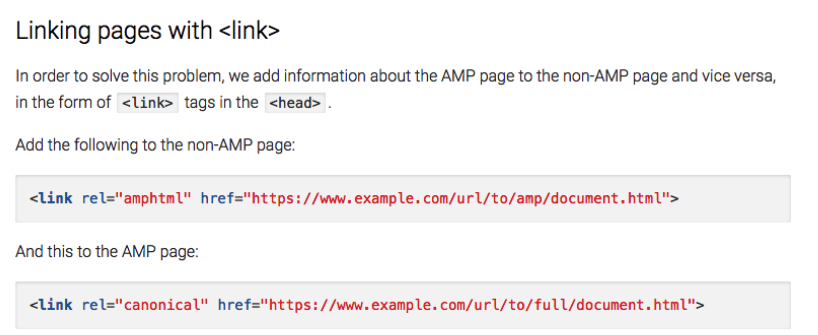
Although the AMP Test page has a Submit Google button, it doesn't mean that your pages will be discovered and indexed for sure. The important thing is to specify your canonical page on your AMP page and mark your AMP page from your Canonical page.
That's it!
AMP Analytics
In order to evaluate AMP data correctly and properly, the installation must first be done correctly. Unfortunately, measurement is one of the most common problems in AMP. Bounce rate, new user, returning user, etc. there are many metrics which can mislead you when Analytics isn't configured correctly.
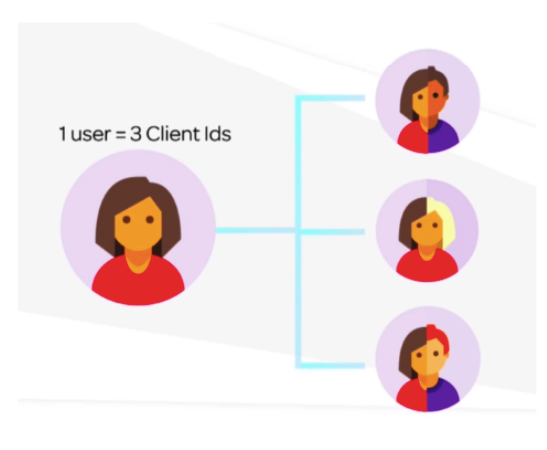
When a person clicks on an AMP page from Google search results, he or she will see google.com at the page domain in their browser. As mentioned earlier, this page is served via Google. However, the user who clicked somewhere else on that page will go there through the domain of the site and this time he will see the address of the site itself, not Google. Therefore, how Analytics counts sessions and how many times the user is counted becomes important here, and often this measurement is made incorrectly.
You can identify each user uniquely with the Google AMP Client ID API, and accurately measure how they visit your site. To summarize the basic tagging that needs to be done to enable the AMP Client ID for AMP pages;
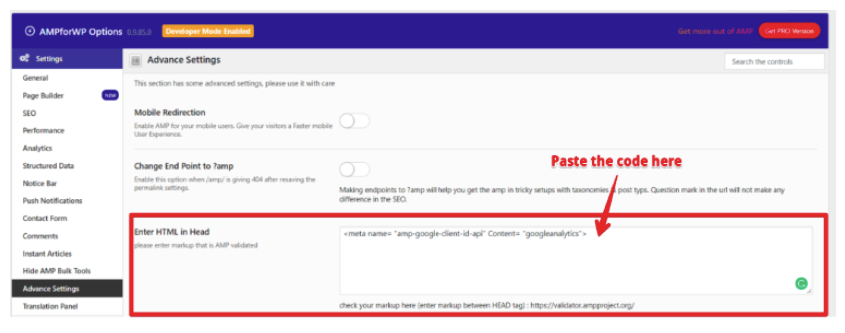
1) AMP Pages
<meta name= "amp-google-client-id-api" Content= "googleanalytics"> We need to have the code above at the head section of all AMP pages. To do this in Wordpress, enter AMPforWP Settings - Advanced Settings and paste this code.
2) Non-AMP Pages
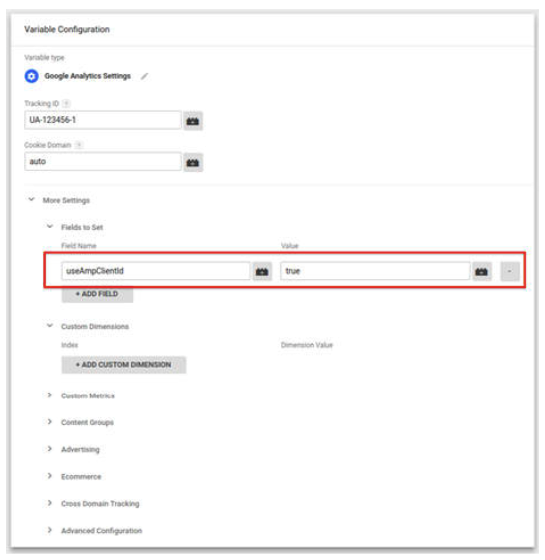
You should enter the following code at the head section of your other pages. ga(‘create’, ‘UA-23199282-1’, ‘auto’, {‘useAmpClientId’: true}); If you use Google Tag Manager; Scroll down to Tag Configuration - Fields to Set.
Set useAmpClientId to true. Save the new label configuration.
3) Adding ampproject.org address to Execution List
Go to the Referral Execution List under your Google Analytics account and add ampproject.org.

4) Page tracking of AMP page views
First of all, we need to have the following code in the head of the source code. <script async custom-element = ”amp-analytics” src = ”https://cdn.ampproject.org/v0/amp-analytics-0.1.js”> </script>
We can then generate tracking codes for page views and/or different events.
The code that should be present on each AMP page for page view; <amp-analytics type=”googleanalytics”> <script type=”application/json”> { “vars”: { “account”: “UA-YYYY-Y” - Enter your own code! }, “triggers”: { “defaultPageview”: { “on”: “visible”, “request”: “pageview”, “vars”: { “title”: “Name of the Article” } } } } </script> </amp-analytics>For ClickOnHeader; <amp-analytics type=”googleanalytics”> <script type=”application/json”> { “vars”: { “account”: “UA-XXXXX-Y” – Enter your own code! }, “triggers”: { “trackClickOnHeader” : { “on”: “click”, “selector”: “#header”, “request”: “event”, “vars”: { “eventCategory”: “ui-components”, “eventAction”: “header-click” } } } } </script> </amp-analytics>
To implement this setup correctly it is definitely worth looking at the support documents.
As we near the end... AMP seems to improve more every year. There's a big team working in the background. So even if you don't intend to use AMP today, you should have this technology in your mind and follow the developments. Finally, believe in the power of testing!


