


3 Steps to Increase LinkedIn Profile Visibility
In this blog post, I will talk about what we need to do for a professional LinkedIn account that attracts attention in every aspect.
LinkedIn is a platform over 930 million people use as of May 2023. It offers various benefits such as searching for job postings, expanding your business network by connecting with new people, and staying updated on industry trends. Research suggests that having a complete LinkedIn profile increases visibility by 30%. Therefore, it is crucial to have a fully set up profile. So what should we pay attention to setting up LinkedIn and using it actively? We will now cover each section in detail.
1. Setting up Your LinkedIn Profile
In the first step of LinkedIn setup, we start by entering basic information such as name, surname, e-mail information, and city of residence. At this stage, people who are actively looking for a job can enter the necessary information to be notified via e-mail when a suitable position opens by entering the position and city alternatives they can work in. In this way, we have the chance to keep up to date with job adverts in different cities for more than one position.

In the next stage, LinkedIn suggests some hashtags and pages that can be followed according to the country you live in, your education, and your work experience. You can proceed after selecting the options that apply to you.
The arrangements we have made up to this point were the mandatory steps required for a basic LinkedIn setup. After that, we will examine in detail the methods you can develop to personalize your account and make it more visible.
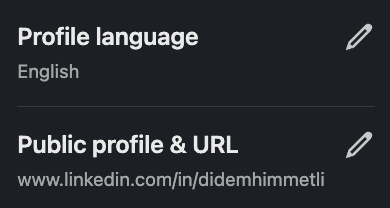
URL and Language Selection
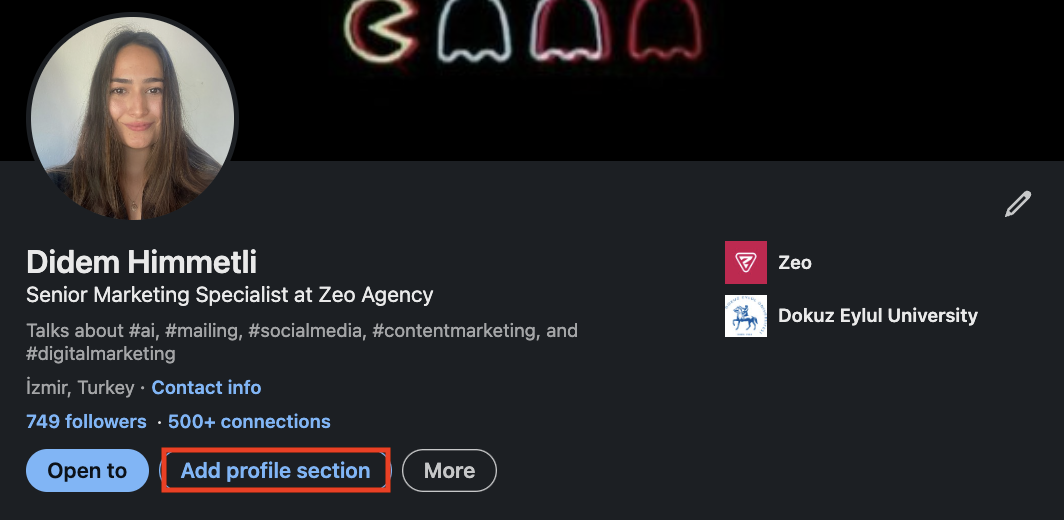
You should ensure that your LinkedIn URL contains only your first and last name. This field will help people find you more easily and will create the perception that you have given due attention to setting up your LinkedIn account. By clicking on the profile icon at the top right of your profile, you can access the 'General profile and URL' section. You can enter 3-100 letters or numbers in this field, but keep it short and memorable to make it easy to find for those searching for you. After changing your account URL directly to www.linkedin.com/in/didemhimmetli by deleting the numbers written after the first and last name, you can continue with the other steps. You can also update your LinkedIn language options from this area.
Selection of Photo and Cover Image
Another stage is to visually diversify your LinkedIn profile. Your LinkedIn photo is one of the most important external images of your LinkedIn presence and it is an indicator of many things about you. After logging in to your profile, you can edit your existing photo or add a new one by clicking on the round photo addition section. If you are currently looking for a job, you can add the 'Open to Work' frame to the edge of your profile photo by clicking on the Frame section at the bottom of the add photo part. If you are a recruiting professional, you can use the 'Hiring' frame from the same section.
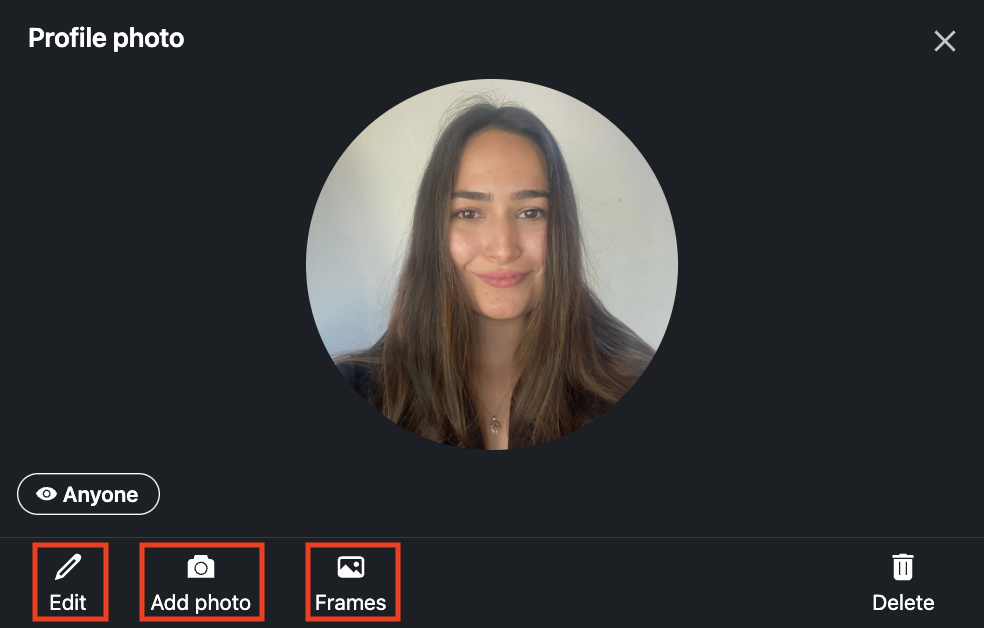
So what kind of photo should be used? It would be appropriate for this area to use a clear and high-quality photograph in which you are dressed appropriately for your job, in the right light, taken in front of a simple background, with your face in the foreground. You should make sure that there is no one else or distracting elements in the photo and your face should cover most of the photo. At this point, instead of using a selfie as a profile picture, it will create a good impression if you make photos taken by professionals as profile pictures.
More than 80% of LinkedIn users use color photos, so choosing a black-and-white photo for your profile photo can help you stand out from a large number of users. However, you should make sure that the contrast and brightness adjustments of the black and white photos you will use are made correctly, in other words, you should make sure that you are using a quality black and white photo.
The image we will add to the cover photo section should be 1584 x 396 pixels and up to 4MB in size. Since this area has more pixels than the profile photo section, it allows you to effectively display the message you want to give about yourself and your profile. If you are a blogger with regular blog posts and your purpose of using LinkedIn is to announce your articles to your target audience, you can highlight your blog posts in your cover image, or if you have received an award and this award is important for your industry, you can add a professional photo of you receiving your award, or if you are someone who provides regular courses, then you can use images that highlight your previous courses in this area.
Headline Section
Your LinkedIn headline is an impressive section where you can give a quick introduction to who you are and what you are doing. When searching on LinkedIn, the first area that users will pay attention to is your profile picture and title section. In this section, it will be noticeable to choose a title that will be different from your colleagues and suitable for your industry. So where can we make this arrangement? After entering your LinkedIn profile, it is enough to click on the edit icon at the top right to edit this section.
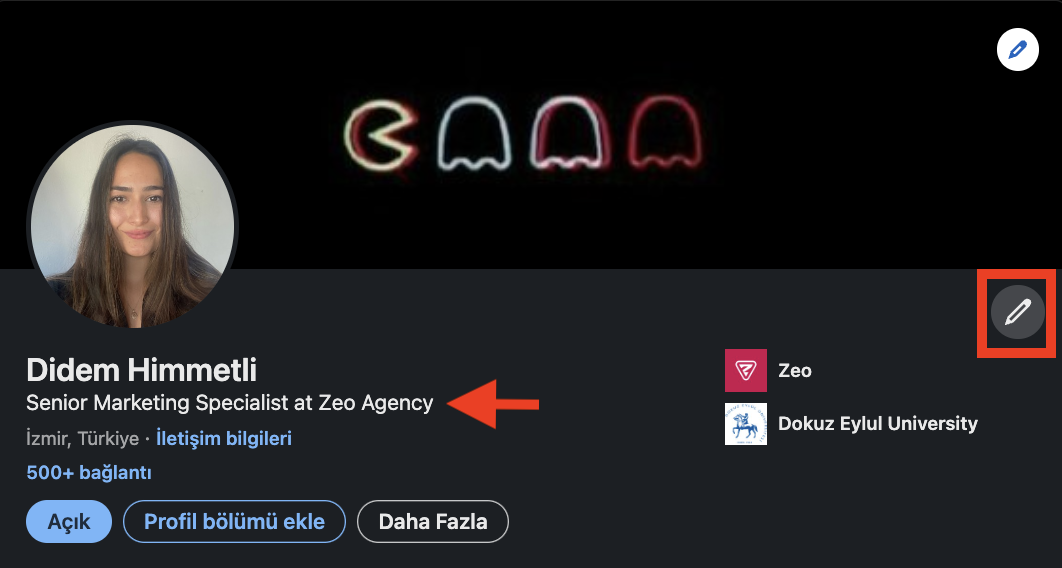
Your LinkedIn headline is an area that has the potential to encourage your target audience to get to know you better and is an important element that shapes how recruiters perceive you. For an effective LinkedIn headline, you should make sure to use keywords related to your industry and department. Using industry-related keywords in the headline will make it easier for recruiters and colleagues to find you. You can review sample headline examples for different industries and positions below:
Marketing Student | Seeking Marketing Job & Internship Opportunities | Social media, E-mail marketing | 2025 Graduation.
Students studying in the marketing department can use this title to demonstrate their desire to experience business life while taking classes.
I Help People Land Their Dream Jobs | Career Coach & Resume Writer | Transforming Careers. This title makes it interesting by accurately articulating the individual's value proposition and expertise.
Business Development Intern @Zeo | Dokuz Eylül University Business Administration Graduated | Open for Work. This heading directly emphasizes the openness to job applications by showing the institution where the internship is currently carried out and the department graduated from.
Software Engineer | PHP, C++ | Seeking Opportunities in Software Development. This title effectively communicates the person's job title, primary skills, and career goal, making it relevant for potential recruiters.
Digital Marketing Strategist | SEO, CVR Specialist, Analytics | Helping Brands Grow. This example of a headline is a specific use, showcases the person's expertise, and includes industry-related keywords to attract targeted audiences.
If you are a marketing expert, mentioning marketing in the title, or if you are a sales expert, mentioning terms used in your industry such as B2B and B2C, and different programs that you think would be helpful to know will make you stand out. Make sure you are clear and specific about what you want to highlight in your LinkedIn header. Consider including your current title, an important award you've won, or competencies that you believe will get you ahead of the competition. Using strategic keywords that people in your industry will search for will increase your chances of showing up in recruiters' searches. However, just like with everything, using these keywords excessively can have the opposite effect, so remember that too much of anything can cause problems. You should use a headline that briefly showcases your skills and experience related to your target audience. By implementing the tips I have provided, you can create a unique LinkedIn headline that accurately represents who you are, uses the right amount of keywords, and grabs the attention of your target audience.
About Section
Adding a summary about yourself in the 'About' section of your profile allows visitors to quickly get to know you. You can think of this as a space where everything on your CV is summarized in a text. After entering your profile, you can click on the 'About' section that appears right below and add information about your career development that you want to highlight, up to 2600 characters.
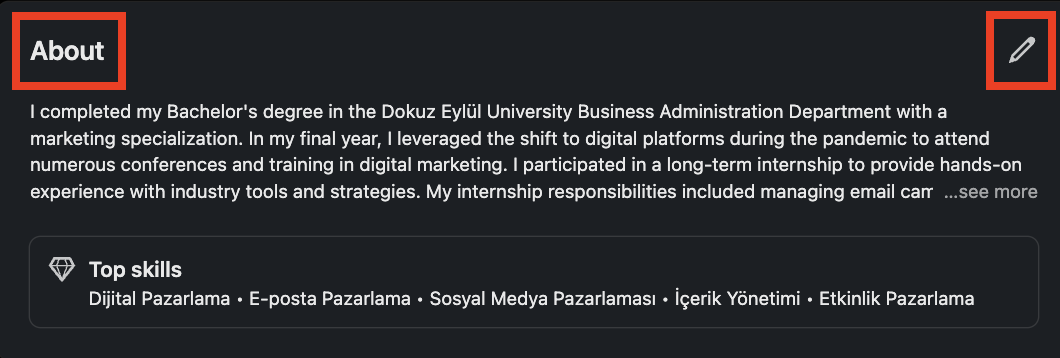
In the "About" section, you should create a summary using professional qualifications, experiences, job descriptions, and important keywords in simple and understandable language. This section allows profile visitors to better understand you before they look at other profile details. You can add information about articles, projects, awards, designs, training, and experiences that you can highlight about yourself. Being different and unique in the LinkedIn "About" section is important, and it is crucial to add the information to be conveyed shortly and concisely without too much circumvention. The elements that you must include in this summary are:
- Professional qualifications
- Work experience
- Achievements (Articles, Awards, Programs, Certificates..)
- Skills and expertise
- Training and Education
- Key projects
The title: You must first specify your title. After clearly stating which position you are working in, you can add the institution you are currently actively working for. In addition to your title, you can highlight any special skills and experience you have. This will emphasize the qualities that set you apart from other professionals and highlight your desire to improve yourself.
Professional Qualifications: You should include the most sought-after professional qualifications in your sector. In this section, you can highlight the programs or certificates that you think will make a difference and emphasize your areas of expertise and skills.
Experience: You can indicate how many years of experience you have in the relevant sector. The duration of experience will make you appear as a more reliable professional to profile visitors. If there are different departments you work in, you can also specify them, in this way, you can show your profile visitors in detail which subjects you are an expert in.
Memberships: If you are a member of an association or society and actively participate in its activities, you can also include your experiences there. This will help people in your social and professional network to have a better understanding of you.
You can use artificial intelligence language models such as ChatGPT and Bing to prepare the text you will add to the About section. After writing your education, skills and work experiences about yourself, we can get support in converting them into text via ChatGPT. I am attaching a simple request that can be written to ChatGPT and ChatGPT's response below. You can customize it for yourself by adding and subtracting:
'About' Section Text Sample - ChatGPT
Prompt:
''I don't know what kind of content I should write about my experiences in the LinkedIn About section. I have completed my education successfully, I have internship and work experience. Can you send me a professional and interesting text to add directly to my LinkedIn About section? You can leave it as .... when adding my name, school, work, and internship experiences, areas of expertise, and the tools I know of.''
ChatGPT’s Answer:
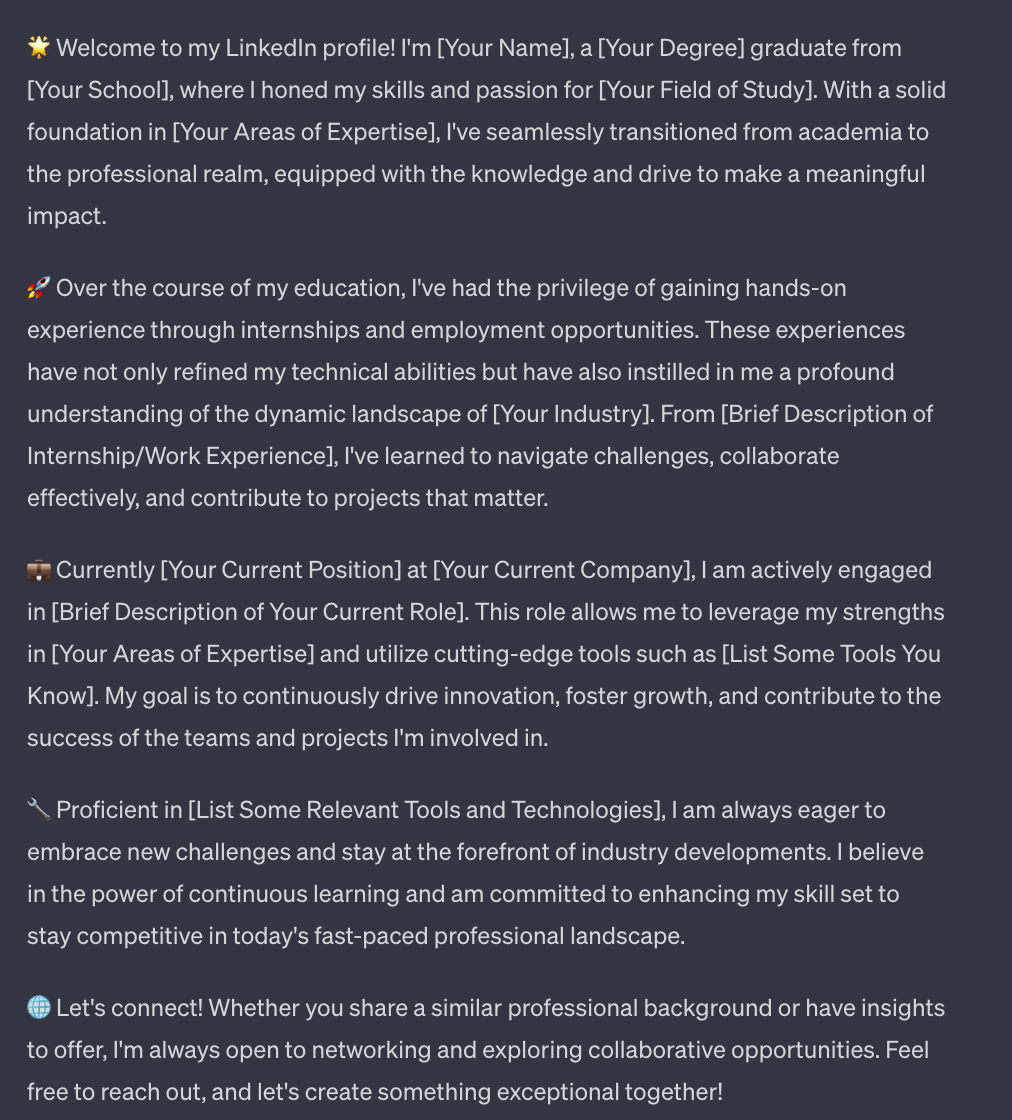
🌟 Welcome to my LinkedIn profile! I'm [Your Name], a [Your Degree] graduate from [Your School], where I honed my skills and passion for [Your Field of Study]. With a solid foundation in [Your Areas of Expertise], I've seamlessly transitioned from academia to the professional realm, equipped with the knowledge and drive to make a meaningful impact.
🚀 Over the course of my education, I've had the privilege of gaining hands-on experience through internships and employment opportunities. These experiences have not only refined my technical abilities but have also instilled in me a profound understanding of the dynamic landscape of [Your Industry]. From [Brief Description of Internship/Work Experience], I've learned to navigate challenges, collaborate effectively, and contribute to projects that matter.
💼 Currently [Your Current Position] at [Your Current Company], I am actively engaged in [Brief Description of Your Current Role]. This role allows me to leverage my strengths in [Your Areas of Expertise] and utilize cutting-edge tools such as [List Some Tools You Know]. My goal is to continuously drive innovation, foster growth, and contribute to the success of the teams and projects I'm involved in. 🔧 Proficient in [List Some Relevant Tools and Technologies], I am always eager to embrace new challenges and stay at the forefront of industry developments. I believe in the power of continuous learning and am committed to enhancing my skill set to stay competitive in today's fast-paced professional landscape.
🌐 Let's connect! Whether you share a similar professional background or have insights to offer, I'm always open to networking and exploring collaborative opportunities. Feel free to reach out, and let's create something exceptional together!
'About' Section Text Example - Microsoft Bing AI
In the second LinkedIn 'About' text creation method, we will use Microsoft Bing AI. The efficiency you will get from Bing will vary according to the variety of information you add to your LinkedIn profile. In this section, we will not provide Bing with anything other than our LinkedIn profile link. Here is a simple example I have tried, you can use it by changing it as you wish:
Prompt:
‘‘Hello, here is the link to my LinkedIn page: https://www.linkedin.com/in/didemhimmetli/
Open the link I provided above, look at my LinkedIn page, think step by step and create a professional LinkedIn 'About' text of 1000 characters. Especially emphasise my education, internship, work experience and volunteer experience. Be professional and clear and emphasise the important parts of my career. Use the first person singular conjugation (e.g., 'graduated' instead of 'graduated'). Look specifically at the education and experience sections of my profile and include a comprehensive list of what I have learnt during my experience. Don't forget to include my current position.’’
Bing’s Answer:
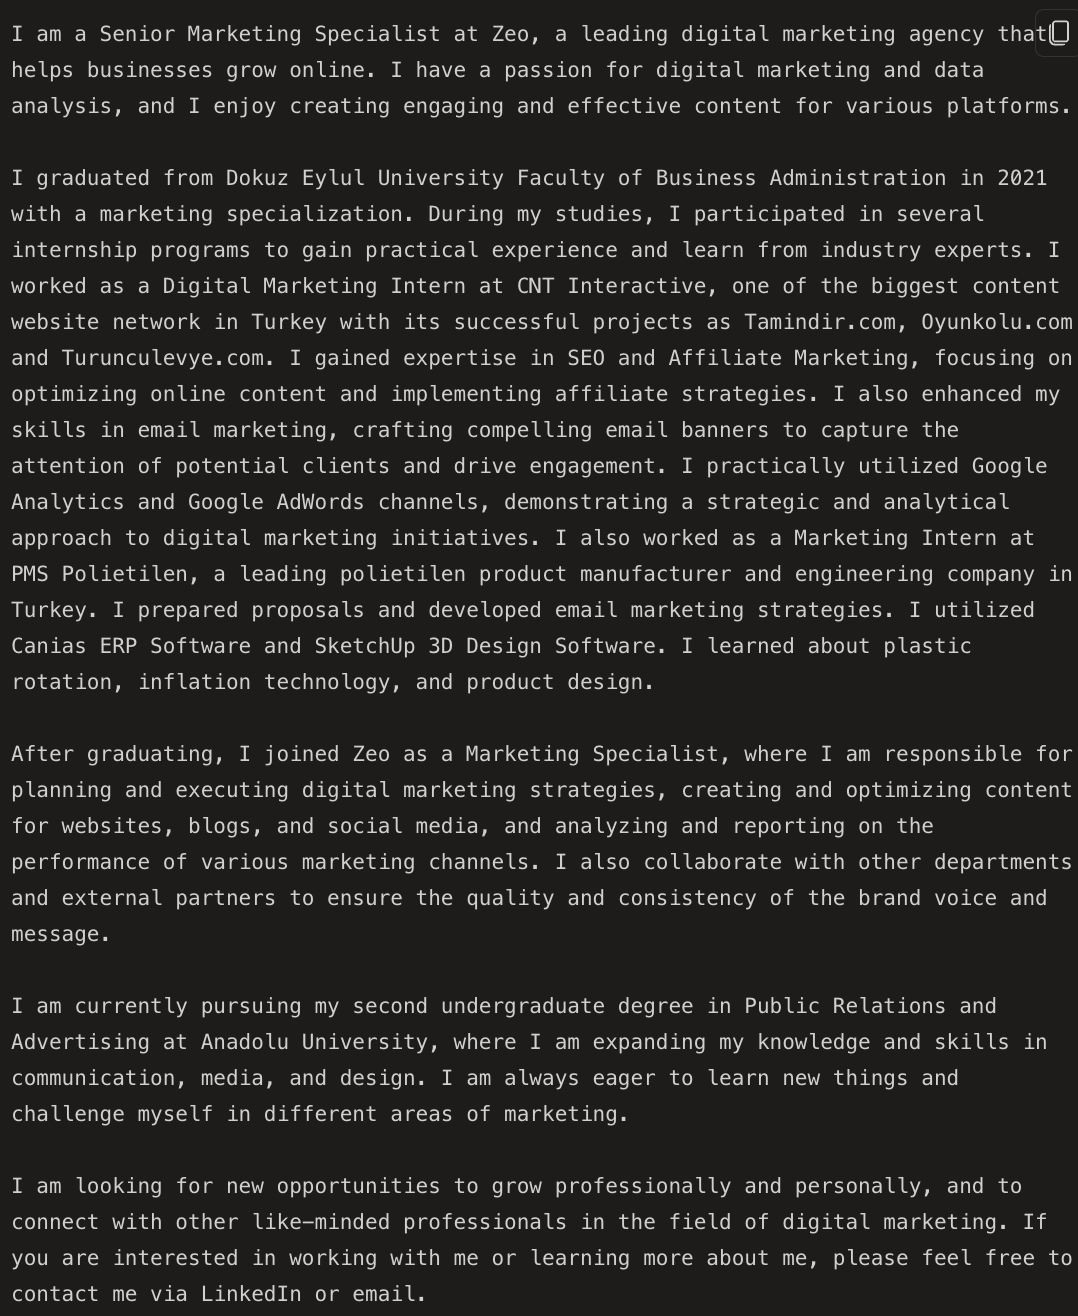
Except for the 1000-character limit, the text can be used with very little revision. At this stage, you can adapt it to yourself with interventions such as 'keep it short' or 'Do not exceed 1000 characters'. You can go directly through these examples, or you can prepare your customized prompts and get more comprehensive texts.
Adding Education and Experience
The "Education" and "Experience" sections on LinkedIn help you to define and emphasize your professional identity and can be found by clicking on your profile and scrolling down a little. Each field has a + sign that allows you to add new experience and education information and a pencil icon that allows you to edit at any time. By clicking on these sections, you can add new experiences and write a sentence about the knowledge you have gained during your experience.

The 'Experience' and 'Education' sections are key sections for you to add your past work experiences, educational information, and skills. In this area, where you will have the chance to reach job opportunities by presenting the first impressions about yourself to employers, you should convey your career development in detail from your education period to the time your professional business life started. First of all, you can add your education information, then your internship and work experiences, and underneath you can add what you have learned during these experiences, which tools and programs you actively use, and which competencies you have acquired in short sentences. You can think of this part as a place where senior people who find your profile by chance will have an idea about your experiences. Considering that these people are likely to be company owners or human resources professionals, seeing your sector and your experience, even if brief, at first glance, may qualify you as a potential candidate for future job opportunities and they may want to examine your work more closely by sending you a connection invitation. At this point, it is important to actively share content after completing your account setup.
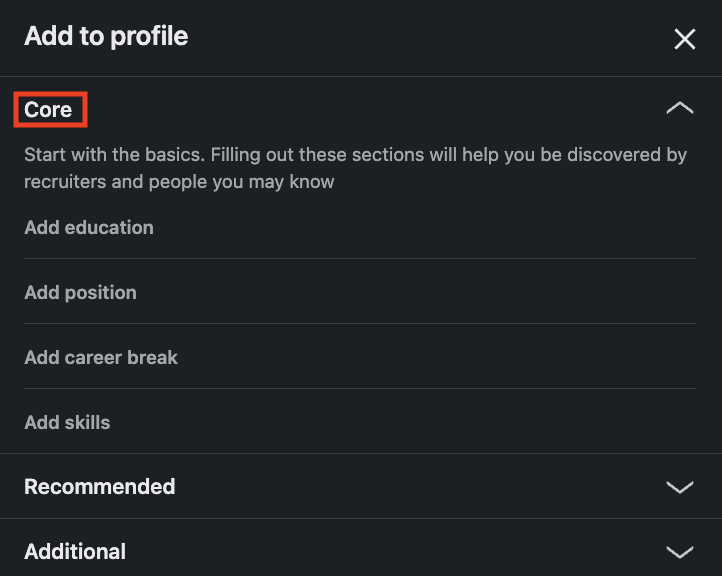
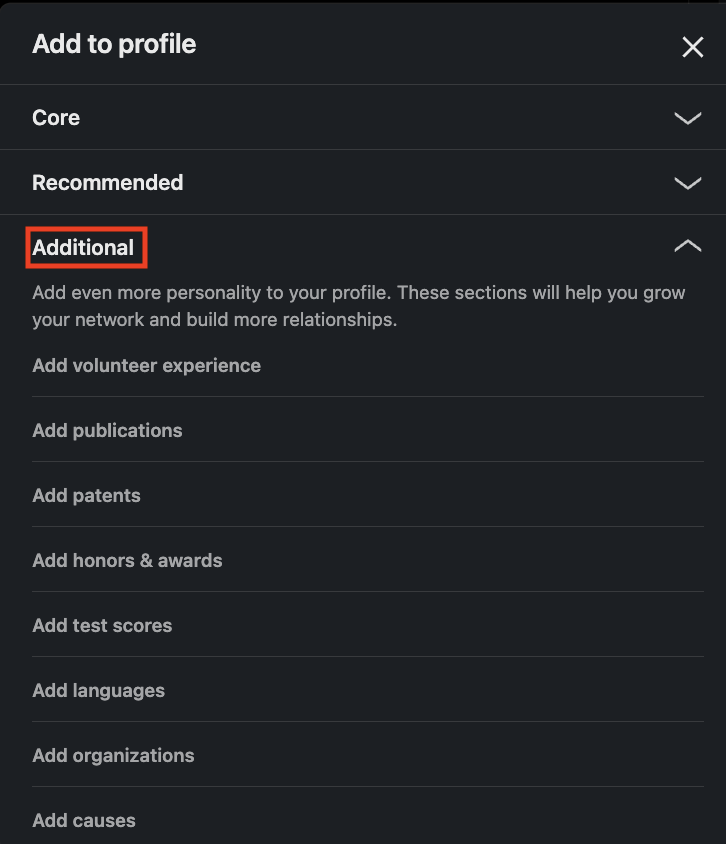
Adding Profile Section
The 'Add Profile Section' field just below your profile photo allows you to include experiences and achievements such as Projects, Courses, Advice, or Awards in your profile. The main purpose of this section is to make it easier for you to be found by career experts and to increase confidence in your profile. So what information can be added here and how?
After clicking the Add profile section button, you will see 3 different sub-headings: Core, Recommended, and Additional. The first one is the 'Core' option, this section allows you to add your basic information such as Education, Position, and Skills. People who have not added this information to their LinkedIn account at the above stages can make the relevant arrangements here. Within the scope of the information added to the skills section, you can verify your competence in this area by taking the short validation tests offered by LinkedIn regarding your experience. Likewise, people you know can support you in verifying these skills.
The second option is the 'Recommended' section, which allows you to add Licences, Certificates, Projects, Courses, and Recommendations. In this section, you can add a comprehensive list of courses you have attended, certificates you have received after a training or conference, or projects you have carried out. In the 'Add featured' section you can add achievements that you would like to highlight throughout your career. A guide or article you have written, any text, document, photograph or website, video, or presentation are some of the examples you can include in these artifacts. In short, you can add the works that you would like to highlight and that you are proud of to this section. The last item of the recommended section is the 'Recommendation' section. Here you can ask for advice about yourself from colleagues you have worked with before or from your academic team. In this way, you can convey a message to the people in your next workplace from the people you have worked with before.

The third and last section is the 'Additional' option. In the Additional section, you can add additional information such as Awards, Exam Scores, Publication, and Volunteer Work that will help you grow your network and make more contacts.
2. Build Your Network and Stay Interactive
The number of LinkedIn connections is one of the most important factors to consider. When communicating with someone for the first time, the number of people they are connected to is one of the points that attracts attention. There is no exact number at this point, but it is recommended to have at least 50 connections. Staying in touch with people in your industry allows you to be aware of both their shared posts and innovations in the industry. You can send a connection request to leading names in your industry and start developing your LinkedIn network. With LinkedIn InMail messages, you can direct messages to LinkedIn members you are not connected with. You can use this service except for members who have disabled receiving InMail messages, and you can add short explanations about why you want to stay in touch while sending invitations to the people you want to connect with. Accounts of institutions and organizations you are currently following, acquaintances from your internship experiences, friends from university, professors, and colleagues can be examples of people you can include in your network. You can also use LinkedIn's search and suggestion features to expand your network. When you connect with people on LinkedIn, you can subscribe to their newsletters as the first step toward interacting with them. After you start to expand your network with the people you know and LinkedIn recommends, the next step is to interact with your connections by liking and commenting on their posts. During the interaction phase, joining LinkedIn groups that are compatible with the sector or fields you are interested in and actively producing content is an important step to strengthen your professional network. By attending virtual or in-person events and online webinars, you can connect and interact with other professionals in the industry. In addition, by actively participating in group discussions and sharing your thoughts, you can experience the advantages of introducing yourself as a valuable member of the professional community.
3. Content Creation and Sharing
Creating content following the platform and your industry is the final step of our 3-step LinkedIn profile visibility blog post. The content creation phase is the section where all the arrangements we discussed earlier will gain visibility. By creating content, you can be more visible by getting a chance to show yourself to the people in your network and the people your connections are connected to. After arrangements are made, you can start sharing blog posts you have written or thoughts on current topics to stay in touch with your network. LinkedIn allows many formats for content sharing, including 300 pages of PPT, PPTX, DOC, DOCX, and PDF files up to 100 MB, 9 photos up to 5 MB, or 1 video up to 5 GB. (Maximum video duration is 15 minutes when uploading from the desktop and 10 minutes when uploading from the mobile application). News, advice, culture stories, insights and trends, event content, and information sharing from your industry are among the recommended content topics. By resharing content you shared in the past and that is still current, you can welcome your new followers with new content, and remind your old followers of information they may have forgotten. 57% of LinkedIn users come to the platform from mobile, so checking how your posts appear on mobile is important for your posts to be effective. Sharing the content you will create in the type allowed by LinkedIn by enabling LinkedIn creator mode will help you interact with your network efficiently. So what is creator mode, and how to enable it?
Creator Mode
Creator mode is currently available free of charge to all LinkedIn users and helps you increase your reach on LinkedIn and engage with your network. To access additional tools and features that help you create content and develop your audience on LinkedIn you can enable creator mode under the 'Resources' heading that appears after logging into your profile.

Advantages of Creator Mode:
Follow button instead of Connect: The Connect button on your profile changes to Follow. Also, your follower count is shown on your profile page.
Tracking Followers: When a user sends you a connection request after you have switched on Creator mode, they will automatically follow you. Even if you decline the connection invitation, it will continue to follow your posts until the user manually unfollows.
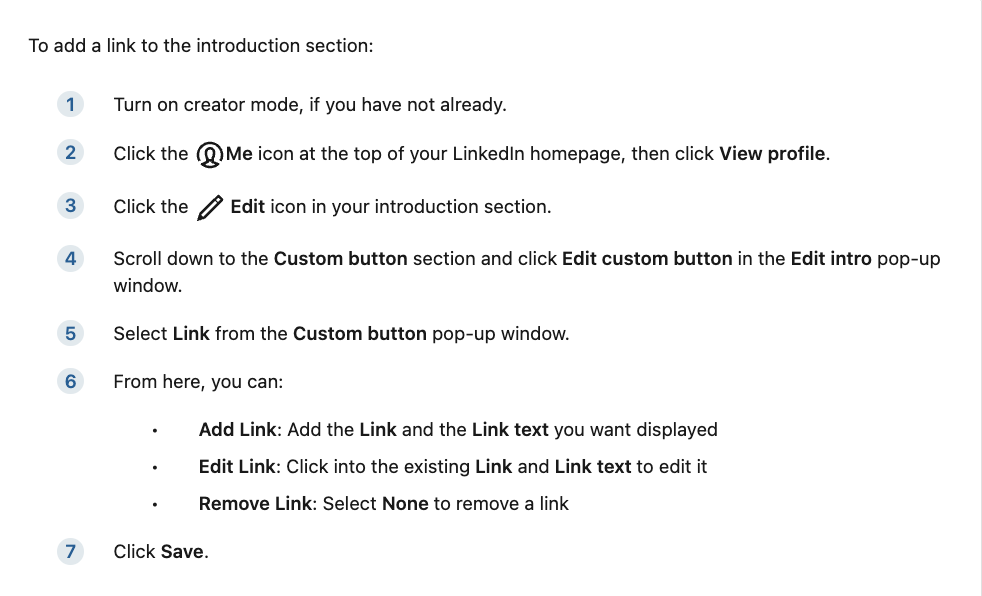
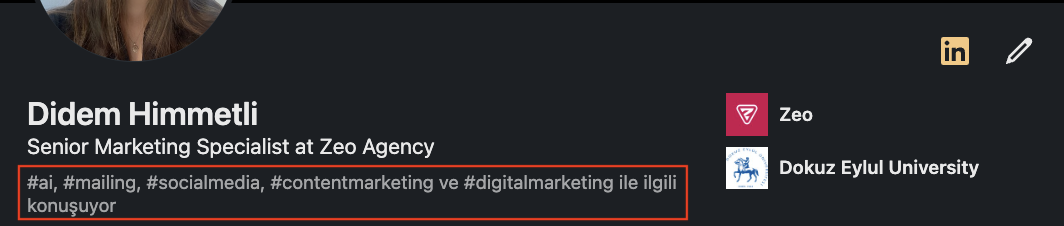
Using hashtags: You can highlight the topics you talk about in your profile as hashtags in the introduction section of your profile. Whenever LinkedIn users view your profile, they will directly see the topic you shared on your profile section hashtags and will be motivated to follow you.
Highlights and Activity Sections: You can highlight your original content in your profile and show your activities in the activity section in a more organized way. In this way, the content you like and comment on in the activity section is not shown. (When you click the See all activities option, you can see your hidden content whenever you want.)
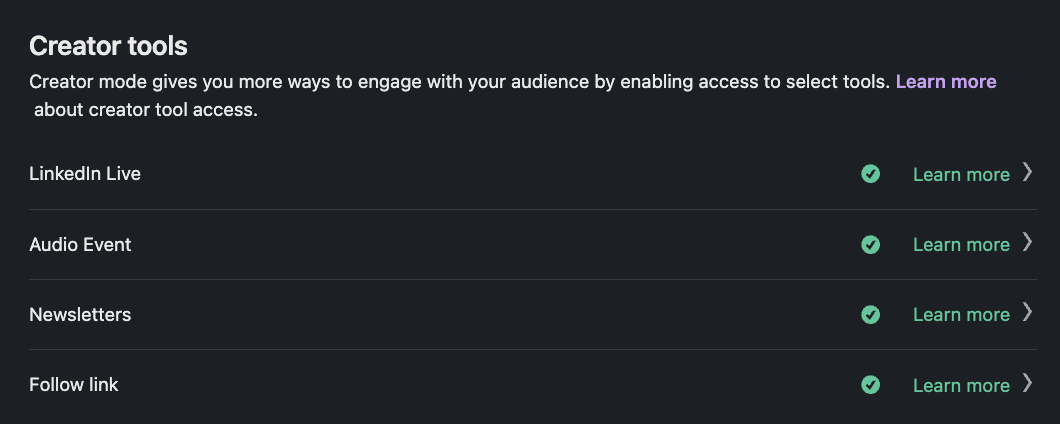
Access to Creator Features: With the creator mode, you can access features such as LinkedIn live, audio events, newsletters, follow link, and have more options to create content and increase engagement with your audience. After opening the creator mode, you can visit the creator tools section and see the tools you have access to, there will be a green tick next to the features you can use. The access criteria include having more than 150 followers or connections, having recently shared original content of any type on LinkedIn such as a short post, image, video, event, poll, or article, and having a good history on LinkedIn by following the Community Policy Guidelines.
Special Tracking Link: You can drive traffic by adding custom links to your website, content, and upcoming events in the login section at the top of your profile. When you switch off creator mode, the link you added will disappear. To access the following link, you must follow the Community Policy Guidelines, your account must have been created less than 48 hours ago, you must not have a spam flag in the last 30 days, and you must not have a serious violation in the last 12 months. You can follow the steps below to add your personalized links to the login section of your profile.
Source: LinkedIn Help
Analysis and Tools: Analysis and tools is a centralized platform where all members can access tools and resources, and is available to all members with creator mode turned on. However, as this feature is new, it is not yet publicly accessible. The topics covered by analyses are as follows:
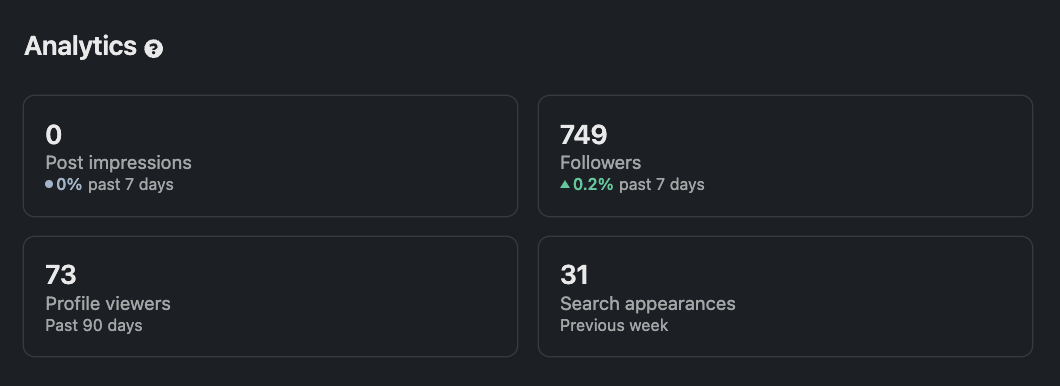
Measuring your performance: It includes features such as profile analytics, bulk post analytics, and audience analytics, offering a comprehensive analytical approach that focuses on information such as who is viewing your profile and how often it appears in search views. This feature is available to all LinkedIn users.
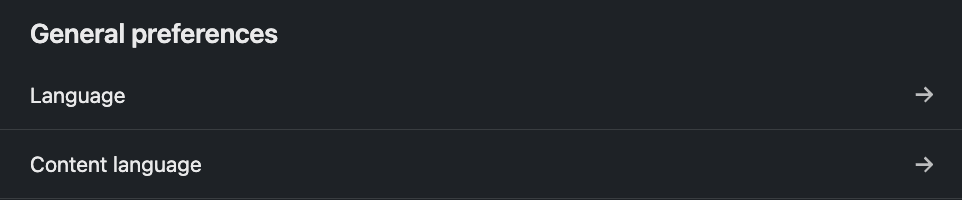
Get content ideas: This feature, where you can get customized post ideas according to your work experience listed on your profile, is generated by AI and refreshed twice a week. It is currently only available to people who use LinkedIn in English. You may not see the ideas section if there are no prompts that match your experience or if you have not recently published original content. To change your LinkedIn language settings, open your Settings&Privacy by clicking on the top right where your profile photo appears. Then, in the general preferences section, you can adjust your language preferences as you wish.
Profile Topics: The ability to add profile topics related to the topics you are talking about is currently only available to users with creator mode turned on.
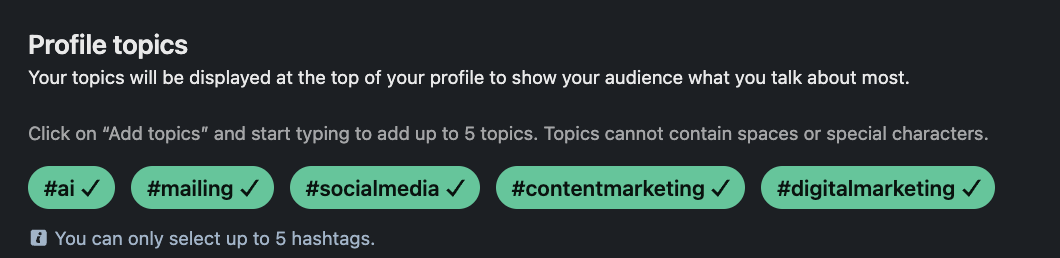
After enabling creator mode under Resources, you can make the topics you talk about visible on your profile by clicking the Add Topic + button under Analyses and Tools.
Newsletter
If your profession allows you to write articles on issues related to your industry and produce new content regularly, you can become a newsletter writer and increase your interaction with your subscribers by sending them updates regularly on your sharing. The LinkedIn Newsletter can be discovered, read, and shared by anyone. In addition, all LinkedIn users can subscribe to your newsletter to be notified of your new posts. According to an article by LinkedIn, the most engaged newsletters are the ones that are so curious that subscribers can't wait for the next post. When creating your newsletters, you can take care to use intriguing, gripping language.
At Zeo, we have 2 different newsletters, one of which consists of updates and trends in AI and one of which consists of current Zeo topics such as blog posts, event announcements, and success stories. We inform people in our network through our newsletters twice a week. You can click here to browse our newsletters, review our posts in detail, and have an idea for creating your newsletter.
PS: To access the newsletter feature, you must have creator mode turned on and have the newsletter access criteria. Newsletter access criteria include having at least 150 connections and not violating community rules. The newsletter usage of people who have opened a newsletter once continues even when the creator mode is turned off.
How to Create a Newsletter?
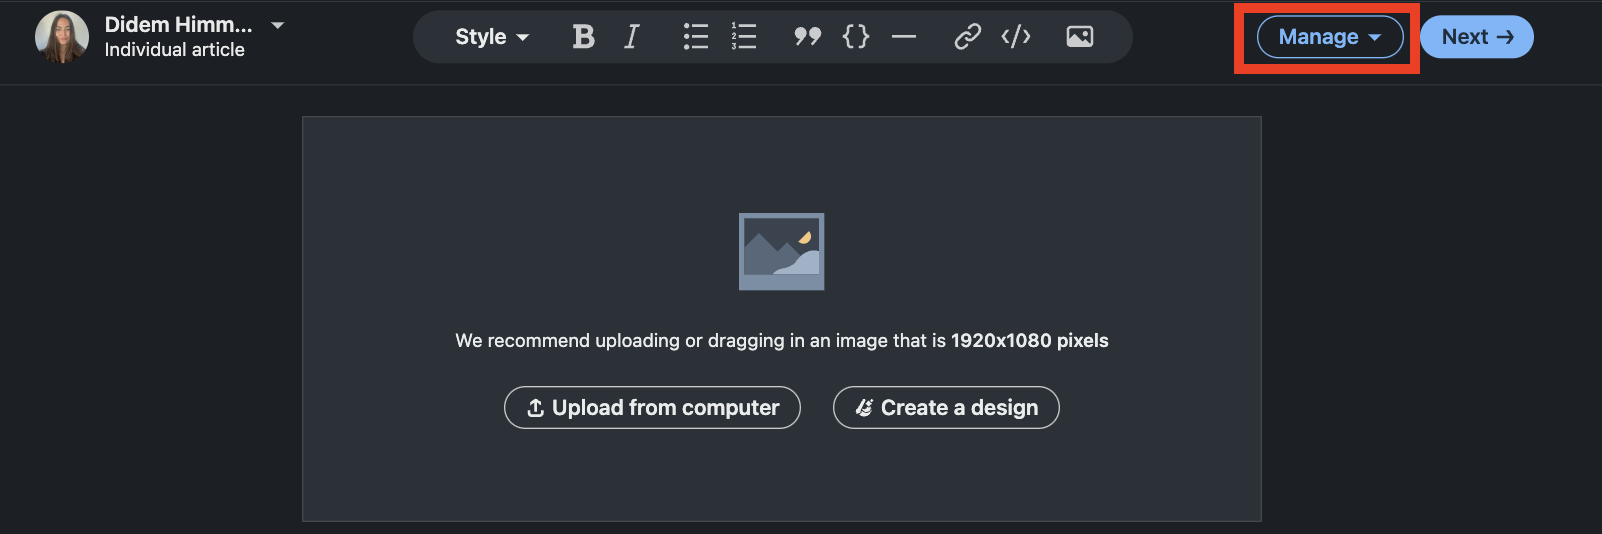
Firstly, you can start the newsletter creation process by clicking on the 'Write Article' section at the top of the home page.

Then, on the page that appears - if you have access to more than one LinkedIn account - you should select the page you want to create a newsletter and continue.
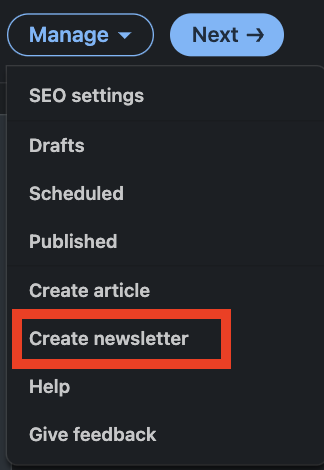
After clicking the 'Manage' button at the top right on the page that opens, you can click on the 'Create newsletter' line among the options that appear.
Then, in the section that appears, you can click 'Done' after adding the newsletter title, newsletter description, how often you want to publish, and an image or logo for your newsletter. Adding emoji to the title of the newsletter is not recommended by LinkedIn, you can pay attention to this when choosing a title.
After creating a newsletter, you can see the title of your newsletter in the upper right corner of the page. If you don't see the newsletter title, you can go to 'Manage' and select the newsletter you want to add your article to. And you are ready to write your first article! Once your content is finalized, you can proceed to the final step of sharing your newsletter with your network by clicking Next from the top right. After adding a few sentences of description about your article, you can share your newsletter in the feed by clicking Publish. At this point, your connections and followers are invited to subscribe to your newsletter by default. When they subscribe, they will receive a LinkedIn notification and email for each new newsletter you write.
After you publish your first post, a newsletter page is automatically created. This page contains your profile information and the articles in your newsletter. You can use this page to preview your newsletter and share it on LinkedIn or other platforms to increase reach. Whilst you do not need to be logged in to view the page, members who wish to subscribe or share the page on LinkedIn must be logged in. You can also share your newsletter articles on your other online channels to get more engagement from your target audience. Authors can create up to five newsletters at the same time.
Advantages of the LinkedIn Newsletter
- You can attract traffic to your website or the channels you want to direct by linking to the content you have shared in your newsletter.
- When you create a newsletter, a subscription invitation goes to your entire network. Thus, you can gain visibility on your connections.
- You can create a community with regular content and have the opportunity to reach more people by informing your community about future events or new product announcements.
- By sharing your newsletters on certain days of the week, you can create a perception of your newsletter among your subscribers. (For example, sharing newsletters every Tuesday and Thursday.)
Conclusion
To summarize, there are three main steps to increase the visibility of your LinkedIn profile. 1- Complete profile setup, 2- Build your network and interact with your connections, 3- Create and share content related to your field of expertise. Implementing these steps by customizing them according to yourself will help you develop your network by allowing you to be easily found by professionals. In this way, you can reach the right people by making the events you organize, the articles you write, or the new product announcements you produce from your LinkedIn profile with a wide network. I hope the information and examples I have given above have been useful to you. See you in new articles!
References
https://www.linkedin.com/help/linkedin
https://www.socialbusinesstr.com/2023/01/05/2023te-linkedin-sayfaniza-takipci-cekmek-icin-15-ipucu/
https://www.socialmediatoday.com/news/LinkedIn-Now-Up-to-930-Million-Members/649239/
https://www.jobscan.co/blog/impactful-linkedin-headline-examples/


